Let me guess. You had downloaded some funny videos from YouTube.com, then you want to add your downloaded YouTube video to iTunes library for playback with your iPhone, iPad, iPod, etc. on the go. But it stuck in the very beginning – import.

Apparently there’s a workaround to get rid of the issue. Since YouTube FLV is not recognized by iTunes, what you need to do next is to convert YouTube to iTunes natively supported format MP4, MOV or M4V, so a YouTube to iTunes converter is needed to accomplish the task.
Here this professional yet easy-to-use YouTube Video Converter- Pavtube Video Converter Ultimate gives you a hassle free experience. (Read best Video Converter Ultimate review) It offers you ultra-fast conversion speed, loss-less video quality, extremely easy conversion steps. This converter can be used to convert any downloaded YouTube video to iTunes compatible format without any hassles. And then all I need is to drag the result videos to iTunes for easy playback and management. What’s more, editing the video is another advantage which means you can customize the video as you like. For mac users, please turn to iMedia Converter for Mac.
How to Convert YouTube to iTunes with high video quality
Step 1. Load YouTube videos
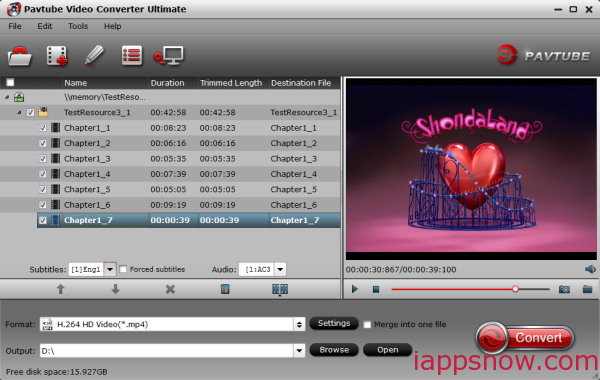
Launch the YouTube to iTunes Converter; click “Add Video” button to import YouTube files into the program. Loaded YouTube clips can be previewed in the right preview window.

Step 2. Decide on output format
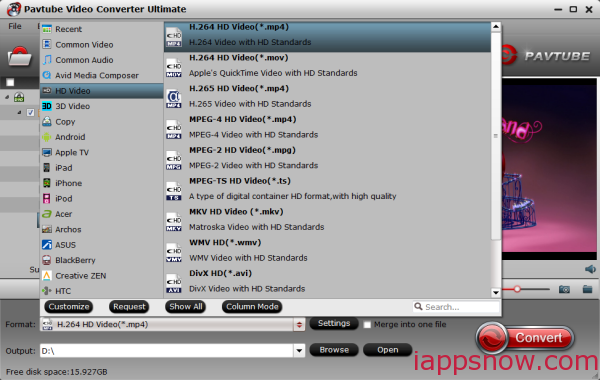
Click the drop down box of “Format”, through which it is possible to select iTunes friendly video format like HD MP4, HD MOV, MPEG-4 HD from “HD Video” profile list.
If you want to add YouTube to iTunes for playing on iPhone, iPad, iPod, Apple TV, etc., you can also directly select iPhone, iPad, Apple TV or iPod as the output format to get videos with optimized settings for your iDevices.

Step 3. Start converting YouTube to iTunes
The final step is to tap the Convert button and commence converting YouTube to iTunes files. After the conversion, click on “Open” button to access to the videos you converted. Open your iTunes and import the YouTube to its Movies library. Below are steps:
1. Download and run the latest iTunes.
2. Click File > Add File to Library.
3. Click View and select Movies, then your movie library will be presented.
4. Click Home Videos and now you can find your transferred videos. In this interface, you can also directly drag and drop local video files.
Additional features of the best YouTube to iTunes Converter:
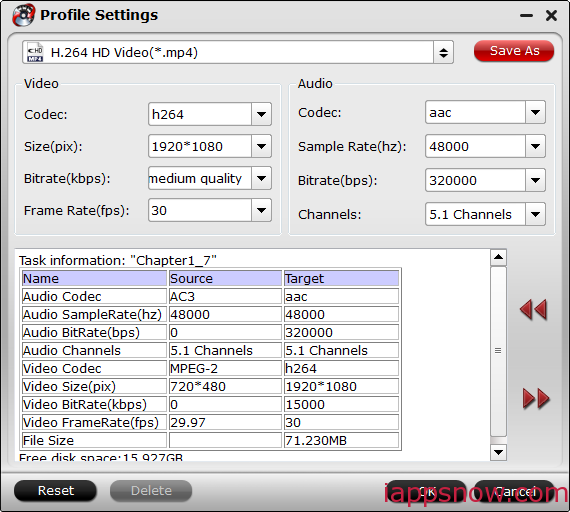
a. Profile settings. If you need, you can also click “Settings” to modify parameters of your output profile to meet your professional needs: bit rate, frame rate, aspect ratio, etc.

b. Edit YouTube movies (Optional). You can even use its provided Edit feature to edit your output video by cropping, adding watermarks, trimming and setting special effect so on.
Now you can put your favorite YouTube FLV movies on your iOS device and enjoy them on the go anywhere and anytime! Besides YouTube FLV, DVD, H.265 and MKV video can be syncing to iTunes library effortlessly.

