As you know, iTunes is a free app that runs on Mac, PC, iPhone, iPod, iPad and Apple TV. With it, you can organize and play digital music and videos on your computer easily, but iTunes is very picky about what kind of formats can be imported into it, including MOV, M4V and MP4, so many of the videos you come across like mkv video on the web can’t be added directly to iTunes or transferred to an iPod, iPhone, or iPad. (Learn how to make iTunes for Windows Launch and Run Faster)
Searching online, I got three possible solution to import and add MKV files to iTunes.:
Solution 1: Using HandBrake – Windows and Mac
HandBrake can convert DVD videos and a wide variety of other video formats you might come across like MKV. You can select your conversion settings in just a few seconds or spend a while tweaking them in detail, whichever you prefer.
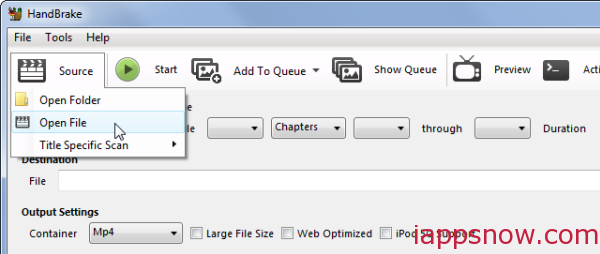
After installing and launching HandBrake, click the Source button on the toolbar, select Open File, and open your MKV file.
Next, click the Browse button under Destination, choose the folder the new MP4 file will be saved to, and enter a name for it.
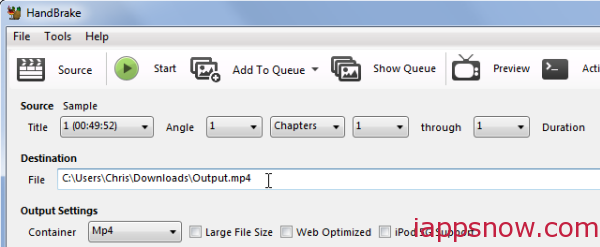
Under Output Settings, the MP4 container format should be selected by default. HandBrake can also create MKV files, but iTunes doesn’t support those.
If you don’t want to do anything extra, you can now just click the Start button and HandBrake will convert your video to an MP4 file. You can then import the resulting MP4 file into iTunes and move it to your mobile device; everything should work normally.
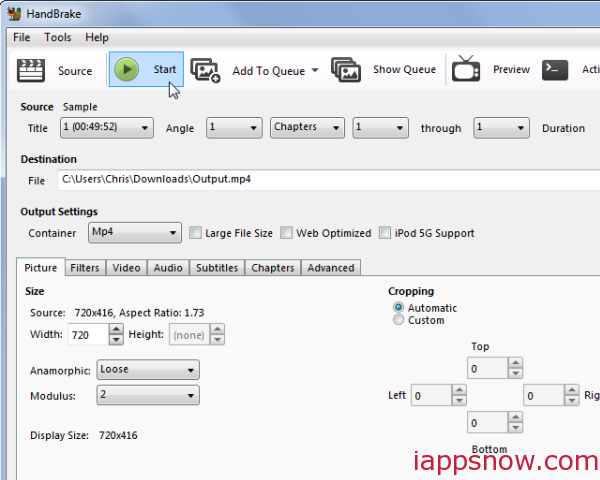
If you’d like to set more quality settings, you can click around using the tabs at the bottom before clicking the Start button. You’re free to set a new height and width for the video, crop it, add filters, change the video quality setting, choose a video codec (but you should probably use the default H.264 (x264) codec), choose codec profiles, import SRT subtitle files, and customize audio tracks.
Solution 2: Using VLC – Windows and Mac
You probably already have the free and open-source VLC media player installed, so why bother downloading another application? VLC is packed with hidden features, and a video converter is one of them. Yes, you can use VLC to convert videos into MP4 format for adding to iTunes library.
Note: You can use the free way to convert MKV to iTunes. However, there’s a catch, you may find the interface can look a bit confusing and the output files seems not in perfect video/audio sync for example, the video will lag behind the sound at some time.
Solution 3: Using Pavtube Video Converter Ultimate – Windows and Mac
So another method recommended by more than one guys is to encode MKV to iTunes with Pavtube Video Converter Ultimate which enables you to convert and import MKV to iTunes library without hassle.
It is an easy to use yet powerful high-quality video converter, player and editor. With it, you can effortlessly change MKV files to iTunes supported MOV, MP4 or M4V files without any loss of quality. If you’re facing incompatibility issues of adding video files like VOB, AVI, TiVo shows, WMV, MPG, FLV, F4V etc. to iTunes, you can just use this great utility to achieve your goal smoothly. The equivalent Mac version is iMedia Converter for Mac. Just get the right one according to your situation.
How to Convert and add MKV files to iTunes(12) with best video quality
1. Load MKV files
Run the MKV Video Converter for iTunes. Click “Add Video” to load one or multiple .mkv file(s) into the program.
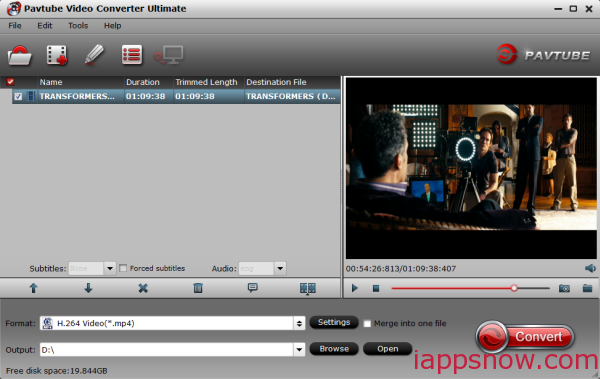
2. Set video format for iTunes(12)
Since iTunes supports MP4, M4V and MOV formats, you can click Format bar and choose any of the three from Common Video as the output file format.
If you eventually want to play the video on your iPhone, iPod, iPod and the likes, you can select your device model from an array of presets.
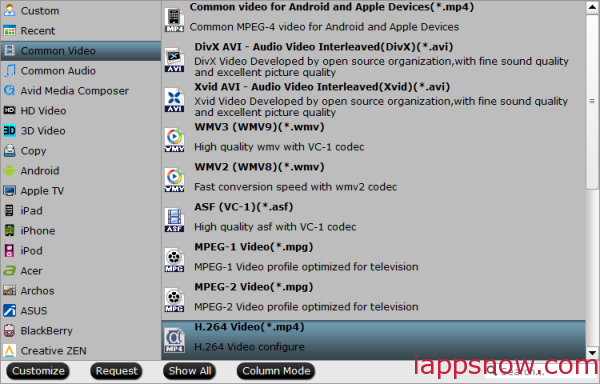
Tip:
a. If the preset video/audio parameters can’t meet your needs, just click Settings icon to adjust the video bitrate, codec, frame rate, audio sample rate, audio channel, etc.
b. If you wanna keep your original subtitle or add new, you can click on “Edit” button, the video editor will pop up. Tap “Subtitle” option and check the “Enable” icon. Then, by clicking on “Browse” to add *.srt, *.ass, *.ssa subtitle file you’ve downloaded.
3. Start the conversion
Hit the big Convert bar to start the MKV to iTunes(12) conversion. The conversion time mainly depends on your source video file size. When the conversion is finished, you can click “Open” to get the generated mkv files.
4. Import video to iTunes library
Now the converted MKV video is ready to be imported into iTunes and if necessary, sync with your Apple device. To import videos to iTunes, open iTunes and go to File > Add to Library or directly drag and drop the converted video to iTunes. And then find the video in the Movies category.
To sync the converted video to your device, first connect your device to your PC or Mac. Then find your device in the iTunes’ sidebar. In the Summary tab, click Sync at bottom to sync iTunes content to iPhone, iPad and iPod via iTunes for enjoying on the go with ease.
This MKV to iTunes converter stands apart from the competitors for its low CPU useage, fast conversion speed and lossless image quality. What’s more, you can also convert Blu-ray, DVD and VIDEO_TS folder for importing to iTunes with this tool.

