Have a lot of video on your iPhone and wish to move them to a NAS drive so that you can free up more space for storing videos downloaded from online streaming sites or shot with built-in camera app. In addition, you may also get the opportunity to stream the iPhone video from NAS to TV for better video or movie enjoying experience. The following article will show you a simple workaround to get the job completed.
Convert iPhone video for TV streaming from NAS
To streaming iPhone video from NAS to TV, you will need to convert the iPhone video into TV playable file formats and you don’t need to care about the format specification of your NAS devices. The main reason is that as a storage devices, NAS has no specific requirements on the file formats stored on it. As for what file formats you should convert iPhone video for TV playing. You will need to consult the user manual or promotional material for the particular set to see which formats it supports. Formats which are supported on many sets include MPG, MP4, DIVX, XVID, WMA and AVI. In addition, some sets will only play a video in a supported format if it is at a specific resolution or within a particular range of resolutions.
The online downloaded video or iPhone recorded video may not supported by your TV, in that condition, you can download our best iPhone video to TV converter – Pavtube iMedia Converter for Mac. Which can assist you to comprehensively all iPhone video with different digital file formats to TV readable file formats. You can then flexibly adjust output video and audio quality by flexibly adjusting output profile parameters including video codec, resolution, bit rate, frame rate, audio codec, bit rate, sample rate, channels, etc as you like to let them fit with your TV playback settings. For those people who have no ideal how to adjust those settings on your own, you can use the program to directly output iPhone video to Sony/Samsung/LG/Panasonic TV Preset Profile formats with the optimal playback settings.
How to Convert iPhone Video for TV Streaming from NAS?
Step 1: Load iPhone video into the program.
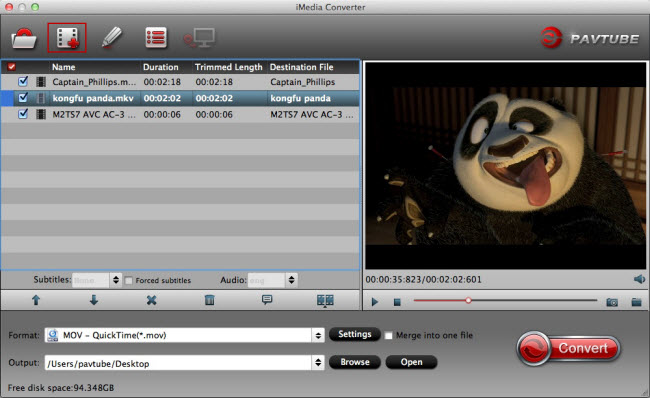
Download the free trial version of the program. Launch it on your computer. Click “File” menu and select “Add Video/Audio” or click the “Add Video” button on the top tool bar to import iPhone video into the program.

Step 2: Define the output format.
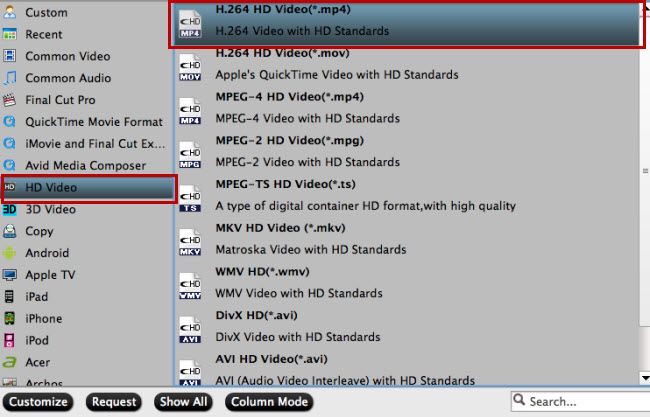
Clicking the Format bar, from its drop-down list, choose one of TV playable file formats such as “H.264 HD Video(*mp4)” under “HD Video” main category.

Tips: Click “Settings” on the main interface to open “Profile Settings” window, here, you can flexibly choose or specify exactly the profile parameters including video codec, resolution, bit rate, frame rate, audio codec, bit rate, sample rate, channels, etc as you like to get better output video and audio quality.
If you have no idea how to adjust output profile settings on your own, just choose to output Sony/Samsung/LG/Panasonic TV preset profile formats.
Step 3: Begin the conversion process.
After all setting is completed, hit the “Convert” button at the right bottom of the main interface to begin the conversion process from iPhone video to TV supported or preset profile formats.
When the conversion is finished, click “Open Output Folder” icon on the main interface to open the folder with generated files. Then feel free to transfer the files to NAS drive for streaming your TV for watching.
: Click “Settings” on the main interface to open “Profile Settings” window, here, you can flexibly choose or specify exactly the profile parameters including video codec, resolution, bit rate, frame rate, audio codec, bit rate, sample rate, channels, etc as you like to get better output video and audio quality.
If you have no idea how to adjust output profile settings on your own, just choose to output Sony/Samsung/LG/Panasonic TV preset profile formats.
Step 3: Begin the conversion process.
After all setting is completed, hit the “Convert” button at the right bottom of the main interface to begin the conversion process from iPhone video to TV supported or preset profile formats.
When the conversion is finished, click “Open Output Folder” icon on the main interface to open the folder with generated files. Then feel free to transfer the files to NAS drive for streaming your TV for watching.
Related Articles
Any Product-related questions?support@pavtube.com


