When you’re uploading the iPad 4K to YouTube, you may invalid file format error message. Why? This is the main anxiety problem with making video published to YouTube for the people first time do with video, because YouTube video whether has strong capability to best engage audience while staying true to creator’s brand depends on that, not only the video contents of whatever entertaining, educational, or inspiring, but also the better video quality of sounds, biterate, and sizes. Read on to get the solution for uploading all iPad 4K videos in the way of editing iPad 4K video, converting iPad 4K video to Youtube.
iPad record 4K video in MOV, MP4 format. But MOV and MP4 videos have various codecs, some of which is not supported by YouTube. And 4K videos are not the best resolution for uploading to YouTube.
Recommended to upload videos in HD for quality playback
- Best Dimension for YouTube 720p HD Video: 1280×720 (16:9)
- Best Uploading YouTube 1080p HD Video Dimension: 1920×1080 (16:9)
- Best 4K Ultra HD (2160p) Video Dimension for Uploading to YouTube: 3840 x 2160 (16:9)
- YouTube Upload Dimensions for 8K FUHD (4320p) Video: 7680×4320 (16:9)
So we recommend you: compress your iPad 4K video and convert iPad 4K video to YouTube best uploading-format like H.264 MP4. And YouTube limits the length of a video file to 15 minutes. It means a user can only upload a video of 15 minutes at most. So if your IPad 4K videos are > 15m, you can split your video with a software.
Luckily, Pavtube Video Converter for Mac can help you done. It can easily split your iPad 4K video to < 15m, compress your iPad 4K video to 1080p, convert your iPad 4K video to YouTube supported video. You can do your job according to your needs. What’s more, you can use it to add subtitle to your iPad video if you need.
Free download this universal software for Mac
Start Convert, compress, edit iPad (Pro) 4K video with Pavtube Video Converter for Mac
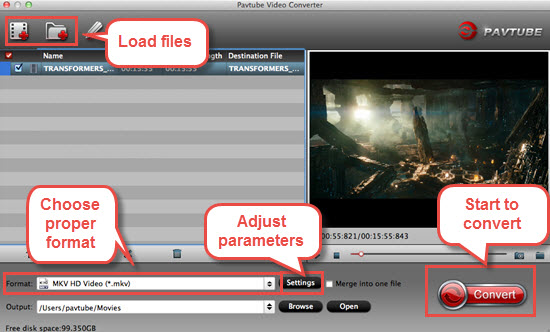
Step 1. Click “Add video” button to add your video files to the program. Or directly drag the video you want to convert to the left item bar.

Step 2. Set right output format. Click “Format” bar, and select H.264 .mp4 from “Common video” or “HD video” to fit YouTube.

Step 3. Split video
When the Video Split window pops up, tick off Enable > Split file size (MB), and either enter the desired maximum size of each file chunk or choose an appropriate size from the available drop down option. In my case I entered 3900 MB for each chunk of file. 4 GB is equal to 4,096 MB, so if you want your file size less than 4GB, just enter/choose the maximum size under 4,096 MB.
2. Click the left square bracket ![]() to set start point, and click the right square bracket
to set start point, and click the right square bracket ![]() to set end point when previewing the video.
to set end point when previewing the video.
Add subtitle: Click Video Editor tab and switch to Subtitle box. Select Enable icon, locate your SRT/ASS/SSA subtitles and load it.
Step 4. Compress iPad 4K video
Click “Setting” you are allowed to set up your own profile presets like Video/Audio codec, filse size, bitrate, frame rate, etc to receive better video quality when uploading, watching, editing etc. Here you can choose 1920*1080 from Size.
Step 5. Click the “Convert” button on the main interface and the software will start to convert iPad (Pro) 4K video to Youtube friendly video formats immediately. When the conversion finishes, click “Open” to find the converted video files. Then you can effortless transfer the video files to forsmooth uplaoding.
Read More:
- Convert YouTube to QuickTime MOV format on Mac
- Convert Youtube videos to MP4/MOV/M4V for iPad/iPhone/iPod on Mac
- Download and Import Youtube Video to iPad Air(2) for watching with Mac
- Convert PowerDirector file to YouTube supported video for uploading
- How to Upload H.265/HEVC Videos to YouTube or Vimeo?


